1
2
3
4
5
6
7
8
9
10
11
12
13
14
15
16
17
18
19
20
21
22
23
24
25
26
27
28
29
30
31
32
33
34
35
36
37
38
39
40
41
42
43
44
45
46
47
48
49
50
51
52
53
54
55
56
57
58
59
60
61
62
63
64
65
66
67
68
69
70
71
72
73
74
75
76
77
78
79
80
81
82
83
84
85
86
87
88
89
90
91
92
93
94
95
96
97
98
99
100
101
102
103
104
105
106
107
108
109
110
111
112
113
114
115
116
117
118
119
120
121
122
123
124
125
126
127
128
129
130
131
132
133
134
135
136
137
138
139
140
141
142
143
144
145
146
147
148
149
150
151
152
153
154
155
156
157
158
159
160
161
162
163
164
165
166
167
168
169
170
171
172
173
174
175
176
177
178
179
180
181
182
183
184
185
186
187
188
189
190
191
192
193
194
195
196
197
198
199
200
201
202
203
204
205
206
207
208
209
210
211
212
213
214
215
216
217
218
219
220
221
222
223
224
225
226
227
228
229
230
231
232
233
234
235
236
237
238
239
240
241
242
243
244
245
246
247
248
249
250
251
252
253
254
255
256
257
258
| <!DOCTYPE html>
<html lang="ko">
<head>
<meta charset="UTF-8" />
<meta name="viewport" content="width=device-width, initial-scale=1.0"/>
<title>SCHD 배당재투자계산기</title>
<script src="https://cdn.jsdelivr.net/npm/chart.js@3.9.1/dist/chart.min.js"></script>
<script src="https://cdn.jsdelivr.net/npm/xlsx@0.18.5/dist/xlsx.full.min.js"></script>
<style>
body { font-family: 'Segoe UI', sans-serif; background: linear-gradient(150deg, #e3fef2, #d1f7e6); color: #065a4e; padding: 20px; }
h1 { text-align: center; margin-bottom: 20px; }
.card { background: rgba(255, 255, 255, 0.7); backdrop-filter: blur(8px); border: 2px solid #9cdbd3; border-radius: 16px; padding: 20px; margin-bottom: 20px; }
.btn { background: #65c4b0; color: #fff; border: none; border-radius: 12px; padding: 10px 18px; font-size: 14px; cursor: pointer; transition: background 0.3s; }
.btn:hover { background: #4aa891; }
.share-btn { text-align: center; margin-top: 20px; }
.flex { display: flex; gap: 20px; flex-wrap: wrap; }
.flex > .card { flex: 1 1 45%; }
.card.double { flex: 1 1 100%; }
.form-group { display: flex; flex-direction: column; align-items: center; margin-bottom: 16px; }
.form-group label { font-size: 14px; margin-bottom: 6px; text-align: center; }
.form-group input[type=number] { width: 80%; padding: 8px 12px; font-size: 16px; border: 1px solid #9cdbd3; border-radius: 8px; }
.tax-group .tax-input, .freq-group .freq-input { display: flex; align-items: center; justify-content: center; gap: 8px; }
.tax-group input[type=number], .freq-group input[type=number] { width: 60px; }
.btn-inline-group { display: flex; gap: 6px; }
.tax-btn, .freq-btn {
background: #fff; color: #065a4e; border: 1px solid #9cdbd3;
border-radius: 8px; padding: 6px 12px; cursor: pointer;
}
.tax-btn.selected, .freq-btn.selected {
background: #65c4b0; color: #fff;
}
#chart { width: 100% !important; height: 400px !important; }
table { width: 100%; border-collapse: collapse; margin-top: 20px; }
th, td { border: 1px solid #9cdbd3; padding: 8px; text-align: center; font-size: 14px; }
th { background: #e3fcef; }
#input-summary p, #result-summary p { margin: 8px 0; font-size: 16px; font-weight: 600; text-align: center; }
#error-msg { color: red; text-align: center; margin: 10px 0; font-weight: bold; }
.right-align { text-align: right; margin-top: 10px; }
</style>
</head>
<body>
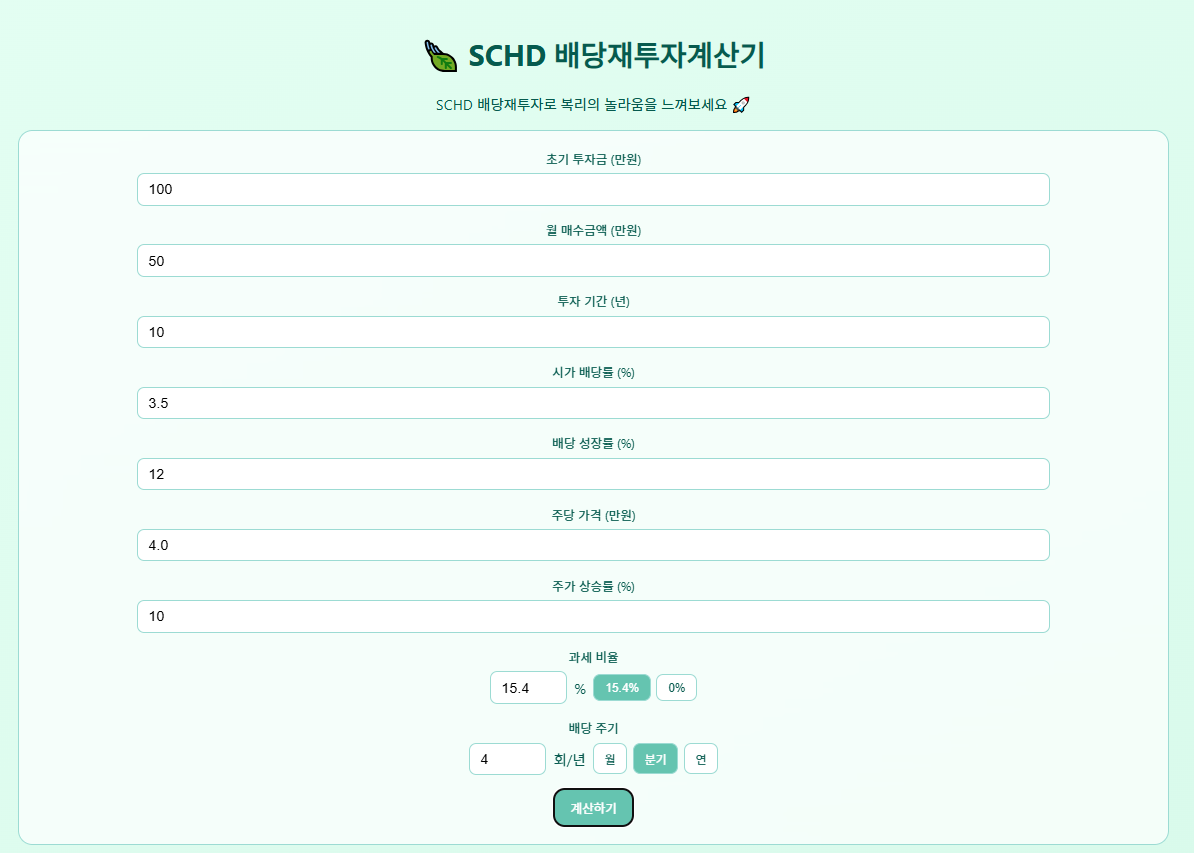
<h1>🍃 SCHD 배당재투자계산기</h1>
<p align="center">SCHD 배당재투자로 복리의 놀라움을 느껴보세요 🚀</p>
<div class="card">
<div class="form-group"><label>초기 투자금 (만원)</label><input id="initial" type="number" value="100"></div>
<div class="form-group"><label>월 매수금액 (만원)</label><input id="monthly" type="number" value="50"></div>
<div class="form-group"><label>투자 기간 (년)</label><input id="years" type="number" value="10"></div>
<div class="form-group"><label>시가 배당률 (%)</label><input id="divYield" type="number" value="3.5" step="0.1"></div>
<div class="form-group"><label>배당 성장률 (%)</label><input id="divGrowth" type="number" value="12" step="0.1"></div>
<div class="form-group"><label>주당 가격 (만원)</label><input id="price" type="number" value="4.0" step="0.1"></div>
<div class="form-group"><label>주가 상승률 (%)</label><input id="priceGrowth" type="number" value="10" step="0.1"></div>
<div class="form-group tax-group">
<label>과세 비율</label>
<div class="tax-input">
<input id="taxRateInput" type="number" value="15.4" step="0.1"><span>%</span>
<div class="btn-inline-group">
<button class="tax-btn selected" data-val="15.4">15.4%</button>
<button class="tax-btn" data-val="0">0%</button>
</div>
</div>
</div>
<div class="form-group freq-group">
<label>배당 주기</label>
<div class="freq-input">
<input id="freqCount" type="number" value="4" min="1"><span>회/년</span>
<div class="btn-inline-group">
<button class="freq-btn" data-val="12">월</button>
<button class="freq-btn selected" data-val="4">분기</button>
<button class="freq-btn" data-val="1">연</button>
</div>
</div>
</div>
<div id="error-msg"></div>
<div style="text-align:center;"><button class="btn" onclick="simulate()">계산하기</button></div>
</div>
<div class="card double" id="output-section" style="display:none;">
<div class="flex">
<div class="card" id="input-summary"></div>
<div class="card" id="result-summary"></div>
</div>
<br>
<canvas id="chart"></canvas>
<div class="right-align">
<button class="btn" onclick="downloadExcel()">CSV/엑셀 다운로드</button>
</div>
<table id="data-table">
<thead>
<tr>
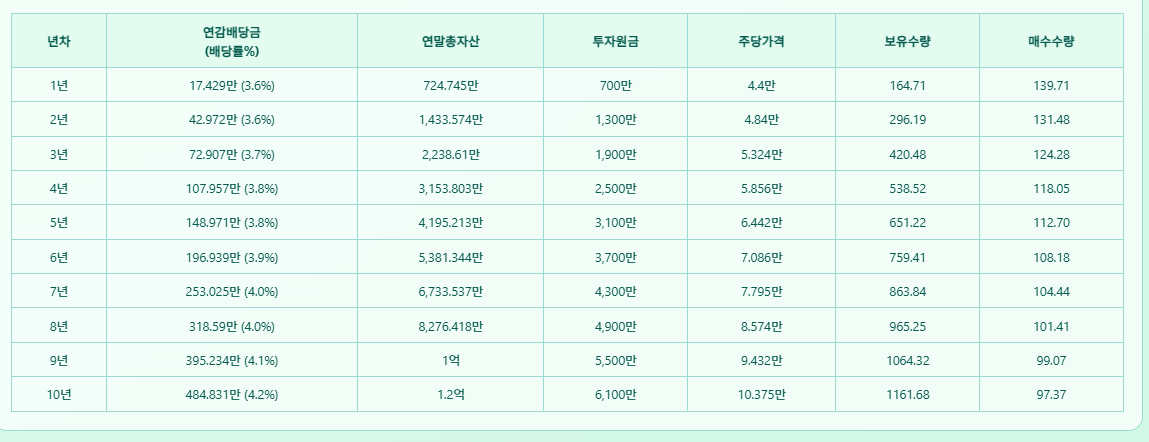
<th>년차</th>
<th>연감배당금<br>(배당률%)</th>
<th>연말총자산</th>
<th>투자원금</th>
<th>주당가격</th>
<th>보유수량</th>
<th>매수수량</th>
</tr>
</thead>
<tbody></tbody>
</table>
</div>
<div class="share-btn">
<button class="btn" onclick="copyShareLink()">🔗 결과 공유 링크 복사</button>
</div>
<script>
let chartInst;
let latestTable = [];
document.addEventListener("DOMContentLoaded", function () {
document.querySelectorAll('.tax-btn').forEach(btn => {
btn.addEventListener('click', () => {
document.querySelectorAll('.tax-btn').forEach(b => b.classList.remove('selected'));
btn.classList.add('selected');
document.getElementById('taxRateInput').value = btn.dataset.val;
});
});
document.querySelectorAll('.freq-btn').forEach(btn => {
btn.addEventListener('click', () => {
document.querySelectorAll('.freq-btn').forEach(b => b.classList.remove('selected'));
btn.classList.add('selected');
document.getElementById('freqCount').value = btn.dataset.val;
});
});
});
function fmtKRW(v) {
if (v >= 1e12) return (v / 1e12).toFixed(1).replace(/\.0$/, '') + '조';
if (v >= 1e8) return (v / 1e8 ).toFixed(1).replace(/\.0$/, '') + '억';
if (v >= 1e4) return (v / 1e4 ).toLocaleString('ko-KR') + '만';
return v.toLocaleString('ko-KR') + '원';
}
function simulate() {
const init = +document.getElementById('initial').value * 10000;
const monthly = +document.getElementById('monthly').value * 10000;
const years = +document.getElementById('years').value;
const divY = +document.getElementById('divYield').value / 100;
const divG = +document.getElementById('divGrowth').value / 100;
const price0 = +document.getElementById('price').value * 10000;
const pG = +document.getElementById('priceGrowth').value / 100;
const tax = +document.getElementById('taxRateInput').value / 100;
const freq = +document.getElementById('freqCount').value;
let shares = init / price0;
let price = price0;
let divPS = price0 * divY;
let grossAcc = 0;
const table = [];
for (let y = 1; y <= years; y++) {
const prevShares = shares;
const prevGrossAcc = grossAcc;
price *= (1 + pG);
divPS *= (1 + divG);
for (let m = 1; m <= 12; m++) {
shares += monthly / price;
if (m % (12 / freq) === 0) {
const gross = Math.floor(shares * (divPS / freq));
const net = Math.floor(gross * (1 - tax));
grossAcc += gross;
shares += net / price;
}
}
const annualGross = grossAcc - prevGrossAcc;
const yieldPct = ((divPS / price) * 100).toFixed(1);
const totalValue = Math.floor(shares * price);
const principal = init + monthly * 12 * y;
const purchased = shares - prevShares;
table.push({
year: `${y}년`, gross: annualGross, yieldPct,
totalAsset: totalValue, principal,
price: Math.floor(price), shares, purchased
});
}
latestTable = table;
const last = table[table.length - 1];
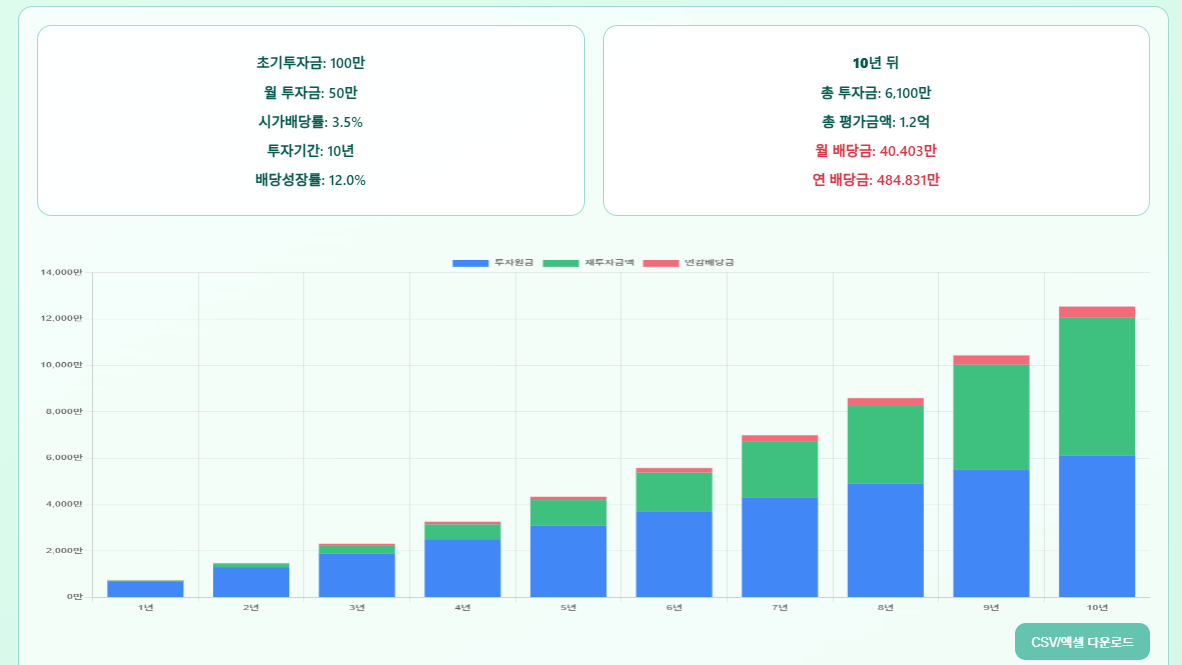
document.getElementById('input-summary').innerHTML = `
<p>초기투자금: ${fmtKRW(init)}</p>
<p>월 투자금: ${fmtKRW(monthly)}</p>
<p>시가배당률: ${(divY * 100).toFixed(1)}%</p>
<p>투자기간: ${years}년</p>
<p>배당성장률: ${(divG * 100).toFixed(1)}%</p>`;
document.getElementById('result-summary').innerHTML = `
<p><strong>${years}년 뒤</strong></p>
<p>총 투자금: ${fmtKRW(last.principal)}</p>
<p>총 평가금액: ${fmtKRW(last.totalAsset)}</p>
<p style="color:#dc3545">월 배당금: ${fmtKRW(Math.floor(last.gross/12))}</p>
<p style="color:#dc3545">연 배당금: ${fmtKRW(last.gross)}</p>`;
document.querySelector('#data-table tbody').innerHTML = table.map(r => `
<tr>
<td>${r.year}</td>
<td>${fmtKRW(r.gross)} (${r.yieldPct}%)</td>
<td>${fmtKRW(r.totalAsset)}</td>
<td>${fmtKRW(r.principal)}</td>
<td>${fmtKRW(r.price)}</td>
<td>${r.shares.toFixed(2)}</td>
<td>${r.purchased.toFixed(2)}</td>
</tr>`).join('');
if (chartInst) chartInst.destroy();
chartInst = new Chart(document.getElementById('chart'), {
type: 'bar',
data: {
labels: table.map(r => r.year),
datasets: [
{ label: '투자원금', data: table.map(r => r.principal/10000), stack: 'a', backgroundColor: '#4187f6' },
{ label: '재투자금액', data: table.map(r => (r.shares*r.price - r.principal)/10000), stack: 'a', backgroundColor: '#3ec07e' },
{ label: '연감배당금', data: table.map(r => r.gross/10000), stack: 'a', backgroundColor: '#f26b7a' }
]
},
options: {
responsive: true,
scales: {
x: { stacked: true },
y: { stacked: true, beginAtZero: true, ticks: { callback: v => v.toLocaleString() + '만' } }
}
}
});
document.getElementById('output-section').style.display = 'block';
}
function downloadExcel() {
const ws = XLSX.utils.json_to_sheet(
latestTable.map(r => ({
년차: r.year, 연감배당금: r.gross,
배당률: r.yieldPct + '%', 연말총자산: r.totalAsset,
투자원금: r.principal, 주당가격: r.price,
보유수량: r.shares.toFixed(2), 매수수량: r.purchased.toFixed(2)
}))
);
const wb = XLSX.utils.book_new();
XLSX.utils.book_append_sheet(wb, ws, 'SCHD');
XLSX.writeFile(wb, 'SCHD_계산결과.xlsx');
}
function copyShareLink() {
navigator.clipboard.writeText(location.href).then(() => {
alert("링크가 복사되었어요! ✨");
});
}
</script>
</body>
</html>
|